A network tap is a handy device that lets you copy the packets going in and out of your network to another computer. When you want to see all of what is passing through your network, a tap is an easy way to grab it. Problem is, active network taps aren't cheap and cheap passive network taps can degrade some network signal. But we can make our OpenWRT router copy the traffic for us!
Using a SOHO router is a cheap way to setup a network tap, but the tradeoff is some complexity and possibly some manipulated data. Network taps are great because they need only some minimal physical setup and then plug them in and go! To get your OpenWRT-flashed router will take some configuration. And, only certain chipsets support the tap feature in hardware. It's possible to emulate the tap in software, but the cost is some lost data (changed MAC addresses).
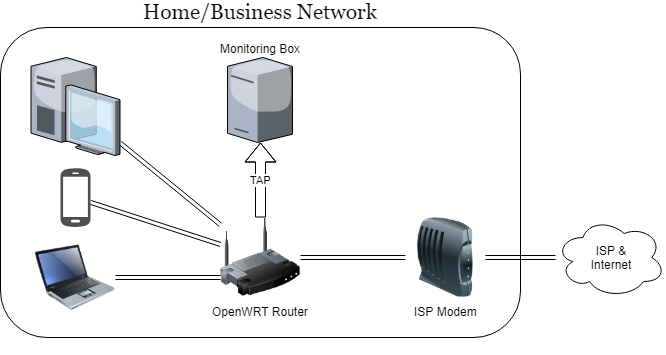
Here's what the setup will look like:
I'm aware of 3 options to make this work.
Option 1: Works Everywhere, Only Captures IP Traffic & Changes MAC Addresses
We can accomplish the tap in software using the iptables TEE module. This will work on every platform, but the TEE module modifies the MAC addresses. It also only captures IP-based traffic. This is usually ok, but just be aware.
On the router, install the support in iptables (which will install the dependent kernel module kmod-ipt-tee)
root@OpenWRT:~$ opkg update
root@OpenWRT:~$ opkg iptables-mod-tee
Next, assign an IP to the system that will receive the monitoring packets. I setup an isolated VLAN on my router, but that's not necessary. Just pick a unique, static IP address. For the sake of the examples below, 172.16.0.1 is the router's interface and 172.16.0.2 is the monitoring box.
Setup the TEE modules with iptables (when you're ready to make these permanent, add them to /etc/firewall.user)
iptables -t mangle -I PREROUTING -i br-lan -j TEE --gateway 172.16.0.2
iptables -t mangle -O POSTROUTING -o br-lan -j TEE --gateway 172.16.0.2
TEEed packets should start flowing immediately to the monitoring system.
Security Note
This is a "soft" tap which does NOT enforce one-way communication to the monitoring box. The monitoring box has an accessible IP address! Beware! This could expose your monitoring box. To try to prevent any accidental communication to/from the monitoring interface, I blocked it on the router via iptables:
iptables -I input_rule -i br-lan -j DROP
iptables -I output_rule -o br-lan -d 172.16.0.2 -j DROP
Option 2: Hardware Tap: Only Works on Certain Hardware; Pristine Packets
The built-in ethernet switches on some routers have hardware that can mirror ports (i.e. network tap or span port) built-in. We can make the hardware do the mirroring between 2 ports. This is only supported on some switches! I tested it on the Atheros AR8327 switch which is on my TP-Link WDR3600 v1.5 router (an older router model with gigabit ports but still works well for me!).
Run the commands below to see if your switch support it. If you see output kind of similar to mine (look for enable_mirror_rx and enable_mirror_tx and mirror_monitor_port and mirror_source_port), then you may be in luck!
root@OpenWrt:~# swconfig dev switch0 help
switch0: ag71xx-mdio.0(Atheros AR8327), ports: 7 (cpu @ 0), vlans: 128
     --switch
        Attribute 1 (int): enable_vlan (Enable VLAN mode)
        Attribute 2 (none): reset_mibs (Reset all MIB counters)
        Attribute 3 (int): enable_mirror_rx (Enable mirroring of RX packets)
        Attribute 4 (int): enable_mirror_tx (Enable mirroring of TX packets)
        Attribute 5 (int): mirror_monitor_port (Mirror monitor port)
        Attribute 6 (int): mirror_source_port (Mirror source port)
        Attribute 7 (int): arl_age_time (ARL age time (secs))
        Attribute 8 (string): arl_table (Get ARL table)
        Attribute 9 (none): flush_arl_table (Flush ARL table)
        Attribute 10 (int): igmp_snooping (Enable IGMP Snooping)
        Attribute 11 (int): igmp_v3 (Enable IGMPv3 support)
        Attribute 12 (none): apply (Activate changes in the hardware)
        Attribute 13 (none): reset (Reset the switch)
     --vlan
        Attribute 1 (int): vid (VLAN ID (0-4094))
        Attribute 2 (ports): ports (VLAN port mapping)
     --port
        Attribute 1 (none): reset_mib (Reset single port MIB counters)
        Attribute 2 (string): mib (Get port's MIB counters)
        Attribute 3 (int): enable_eee (Enable EEE PHY sleep mode)
        Attribute 4 (none): flush_arl_table (Flush port's ARL table entries)
        Attribute 5 (int): igmp_snooping (Enable port's IGMP Snooping)
        Attribute 6 (int): vlan_prio (Port VLAN default priority (VLAN PCP) (0-7))
        Attribute 7 (int): pvid (Primary VLAN ID)
        Attribute 8 (unknown): link (Get port link information)
The relevant options that we are going to use are:
        Attribute 3 (int): enable_mirror_rx (Enable mirroring of RX packets)
        Attribute 4 (int): enable_mirror_tx (Enable mirroring of TX packets)
        Attribute 5 (int): mirror_monitor_port (Mirror monitor port)
        Attribute 6 (int): mirror_source_port (Mirror source port)
If you have options like that, your hardware should support this awesomeness.
Vlan Setup
So to set this up, we need (well, should) create a separate VLAN for the port we will mirror to. The hardware doesn't appear to require this, but I don't want packets getting mixed up.
By default, the TP-Link WDR-3600 only has 2 VLANs (one for the LAN and one for the WAN). I reconfigured /etc/config/network
# add this to the end of the interface
config interface 'tap'
        option ifname 'eth0.3'
        option proto 'none'

# replace the config switch stuff with this

config switch
        option name 'switch0'
        option reset '1'
        option enable_vlan '1'

config switch_vlan
        option device 'switch0'
        option vlan '1'
        option ports '2 3 4 0t'

config switch_vlan
        option device 'switch0'
        option vlan '2'
        option ports '1 0t'

config switch_vlan
        option device 'switch0'
        option vlan '3'
        option ports '5 0t'
Reboot to make the config apply.
Caution: Sometimes the port numbers printed by the manufacturer on the outside do NOT match the port numbers that show in software. If it doesn't appear to work, try another port.
Enable Port Mirroring
Now it's time to turn on the port mirroring. Per the config above, the destination monitoring port is port # 5.
First we can see the current settings (which show the feature is disabled):
root@OpenWrt:~# swconfig dev switch0 get mirror_source_port
0
root@OpenWrt:~# swconfig dev switch0 get mirror_monitor_port
0
root@OpenWrt:~# swconfig dev switch0 get enable_mirror_tx
0
root@OpenWrt:~# swconfig dev switch0 get enable_mirror_rx
0
Now we're going to turn the feature on. We're going to send the data coming on port 2 (which is LAN port 1 on my TP-Link WDR-3600 v1.5) and send it to port 5.
root@OpenWrt:~# swconfig dev switch0 set mirror_monitor_port 5
root@OpenWrt:~# swconfig dev switch0 set mirror_source_port 2
root@OpenWrt:~# swconfig dev switch0 set enable_mirror_rx 1
root@OpenWrt:~# swconfig dev switch0 set enable_mirror_tx 1
Mirroring packets should start as soon as those last 2 commands are run.
Option 3 (theory only, untested!): Only Works on Certain Hardware; Pristine Packets
In this option, we use the software package daemonlogger to simulate a tap (technically a "soft tap"). daemonlogger is exactly designed for this kind of use case.... but...
This did not work on the hardware I tested on (Linksys EA4500 and TP-Link WDR3600). I believe it fails because of the built-in ethernet switch's MAC address table. daemonlogger relays the packets as-is, but the switch looks at the MAC addresses and notes that there is no system live with those MAC addresses and so it doesn't relay the packet. When I tried this, all I ever saw on the monitoring box was BROADCAST packets send to ff:ff:ff:ff:ff:ff. Boo. But here's the general setup if you want to try on different hardware. I think this should work if you use a port that is not connected to a built-in switch.
Install the daemonlogger package
opkg update
opkg install daemonlogger
You'll need to setup a separate VLAN as in Option 2 above.
Tell it to relay packets from the LAN segment (br-lan) to the TAP interface (eth0.3 in this case)
daemonlogger -i br-lan -o eth0.3
Conclusion
Happy tapping!